Monday, December 7, 2009
Hearty vegetable soup = a great way to clear out the vegetable drawer
Since moving last July, I do not yet have a fully functioning veggie garden. In response, I am splitting a winter CSA (community supported agriculture) share with some friends. The farm we bought a share from is Jubilee Farm in Carnation, WA. It is a good thing we are sharing it, because each week we receive a HUGE box of produce. I find myself struggling to keep up with the vegetable drawer. One sure fire way to use up my veggies before receiving the next huge box is to make soup. Winter soups are hearty and delicious, and can be made with just about any veggies you like. Since I am mostly receiving root veggies from my CSA box, my soups have been heavy on those ingredients lately.
I made a soup from the following ingredients today:
leeks, celeriac, potatoes, celery, carrots, thyme, rainbow chard, farfalle (bow tie pasta), chicken broth, water, sea salt, butter.
Some of these are ingredients that I did not grow up with, and have only learned about since college.
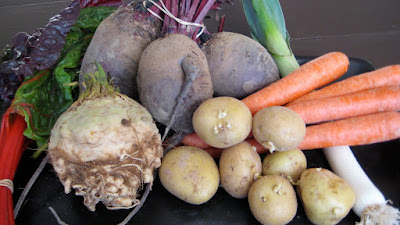
Celeriac, also called celery root, is the really ugly root in the photo above. It is in fact the root of a celery plant, although they are different varieties, one bred for the stalk, and the other for the root. Celeriac has a flavor a lot like celery, but a texture very similar to a potato. This makes it a great veggie to use in purees, mashes, and to thicken soups with.
Leeks are the long scallion-looking things in the photo above. They have a delicate onion flavor, and can be minced and sauteed similarly to onions. Only use the white and light green parts of a leek. Also, be sure to cut in half length-wise, as I have done in the photo, to be able to clean well between the layers. Leeks always seem to trap a lot of soil between the layers... not something you want in your food.
Rainbow chard is a delicious and beautiful dark green leafy vegetable. The leaves are too thick and tough to eat raw, and should be cooked similarly to spinach to be enjoyed to their fullest. The colorful center rib is very tough and stringy in mature leaves, and should be removed prior to cooking.
I made my soup by first sauteing the leeks and fresh thyme in some butter and salt for a few minutes. Then I added the potatoes, celery, minced celeriac and coarsely diced carrots. I let it all saute and brown for a bit. Then I added chicken broth and water (50/50 by volume) to cover. When the potatoes were tender I added a bit of farfalle pasta and then some chopped chard at the very end. Before eating, I grated some parmesan cheese over the soup.
Other things that would be good in the soup:
Any other grains that you may have (rice, quinoa, barley, etc...), beans like lentils, garbanzo, and cannellinis, onions, garlic, tomatoes, kale, parsnips, parsley, oregano, or just about anything else you may have in your veggie bin.
Labels:
carrots,
celeriac,
celery,
leek,
potato,
rainbow chard,
soup,
thyme,
vegetarian
Root veggies!
Winter is the time to celebrate root vegetables. My CSA boxes, from Jubilee farm, are now full of root vegetables with perhaps a squash and some winter greens here and there. Potatoes, celeriac, turnips, rutabaga, parsnips, carrots, and beets are main staples on our dinner table these days. I find that soups, mashes, purees, and roasts are the best ways to enjoy many of these hearty and nutritious veggies.
Here is an example of a recent meal: Roast chicken breasts with potato and turnip mash, and roasted carrots.
Root vegetable mash: I used a combination of potatoes, turnips, and leeks, but parsnips and celeriac would also work beautifully on their own or combined with any of the other root veggies.
This is how to make the mash I made:
Chop and thoroughly clean leeks. Saute leeks in olive oil with salt and pepper, until tender and beginning to brown, then remove from heat. Peel and coarsely dice your root veggies. Cover with salted water, and bring to a gentle boil. Once tender, drain the veggies and return to pot. Add a couple tablespoons of butter, little warm milk, and your sauteed leeks. Mash with a potato masher. Adjust consistency by adding more or less milk. For a smooth puree, rather than a mash, first process your veggies through a food mill or potato ricer, before adding dairy.
Roasted chicken breats: season your bone-in, skin on chicken breasts with olive oil, salt and pepper, and any herbs you like (I used a combination of sage and thyme).
roast at 375 deg. F for approximately 40 minutes or until an instant read thermometer registers between 160 and 165 deg. F. Tent chicken with foil, and let rest for about 20 minutes.
Roasted carrots:
I like to prepare 2-3 carrots per person. Peel and coarsely dice your carrots (1 inch pieces). Season with olive oil, salt and pepper. Place on a sheet pan and roast along side your chicken (375 deg. F) for 30 minutes, or until the carrots are tender and caramelized. If you like your carrots even sweeter, feel free to coat with a teaspoon or so of maple syrup when the come out of the oven, or in the last 10 minutes of roasting.
Hint:
Use any left overs to make chicken noodle soup the next day.
Saturday, November 7, 2009
Pumpkin time
Some of us are mildly in love with the pumpkin. In the last few weeks I have done a lot more with this beloved squash than carve jack-o-lanterns.
I have scooped out the top of tiny pumpkins to turn them into fun votives, I have made pumpkin ice cream, and tonight I made pumpkin butter. mmmmm pumpkin butter. Pumpkin butter is a lot like apple butter, but with pumpkin pie spices and pumpkin rather than apples. It tastes delicious spread on toast or pancakes, or even poured over vanilla ice cream.
Here's how you make it:
3 cups pumpkin puree
3/4 cup apple juice
1 1/4 cup brown sugar
2 Tbs maple syrup
1 tsp vanilla extract
1 tsp cinnamon
1/2 tsp nutmeg
1/2 tsp cardamom
1/4 tsp cloves
1 tsp ginger
In a sauce pan combine all ingredients and mix well. Cook over low heat for at least 1 hour or until mixture is thick. Store in glass jars in the refrigerator for up to 1 month, or up to 6 months in the freezer. Feel free to adjust spices to your personal liking.
*The USDA does not recommend canning pumpkin puree products.
To make your own pumpkin puree, start with 2 sugar pumpkins. Cut the pumpkins in half and scoop out seeds. Place pumpkins face down in a roasting pan, cover roasting pan with foil, and bake at 350 for 1.5 to 2 hours, or until the flesh is very soft. When cool enough to handle, scoop flesh away from skin, and puree in a food processor until completely smooth.
Bolognese sauce: Kristen's tomatoes are now week night meals waiting in my freezer.
With a portion of my friend Kristen's 90 lb harvest in tow, I had to figure out something to do with all those tomatoes.
Bolognese is a hearty, yet decadent, meat and tomato sauce that I would never dream of making on a week night. It requires hours of chopping, browning, deglazing, and then simmering on the stove top. The good news, however, is that it is really easy to make in large batches, and then freeze into individual meal sized containers.
Now that we are in the cool wet season, nothing is better than coming home after a long day and having something hearty and warm on the table in 20 minutes. Bolognese is perfect for lasagna, but as a week night meal, I simply serve it with spaghetti.
Here's what to do to make Bolognese:
2 lbs ground meat (mixture of beef, veal, pork, lamb... your preference here)
2 28oz cans of whole peeled tomatoes or the equivalent of fresh peeled tomatoes
2 cups whole milk
2 cups dry white wine
4 large carrots diced
1-2 stalks celery diced
1 large onion diced
4 cloves garlic
1 hot pepper minced, or 1 tsp red chili flake
2 tsp dried thyme or 1 Tbs fresh
2 tsp dried oregano or 1 Tbs fresh
2 Tbs sun dried tomato paste
Salt and pepper to taste
In a large, heavy bottom pot brown the generously salted meat in batches, over medium high heat. Be careful not to turn the meat often as this will prevent it from developing a nice crust, and fond from developing on the bottom of the pot. Once all the meat is browned remove it with a slotted spoon and let rest in a medium sized bowl. Add carrots, onion, and cellery to pot, and cook over medium low heat. Once the onions start to become translucent add the chili pepper, garlic, thyme, and oregano stiring frequently so the garlic does not burn and bitter. After about 1 minute add the tomato paste, and mix. After about 1 more minute add the meat back to the pot and mix with vegetables.
Add the whole milk to the pot. This step really helps to tenderize the meat, so use this time to break up any large chunks of meat with your wooden spoon. Continue to simmer until the milk has reduced by more than half (it should look almost all gone).
Add the wine to the pot. This step helps to add acid, depth of flavor, and deglazes any fond (brown bits) that might be sticking to the bottom of the pot. Use your wooden spoon to scrape up any stubborn brown bits at this time. Brown bits=great flavor, so make sure to get them worked into the sauce. Once the wine has reduced by more than half, add the tomatoes. Either crush the tomatoes by squeezing them through your hand, or with the back of your spoon. Let sauce simmer for at least 1 hour, and up to 3 hours. Stirring occassionally to ensure that nothing sticks to the bottom of the pot. when finished, sauce should be thick and predominately meaty.
Enjoy!
Thursday, October 22, 2009
If your kitchen looks anything like mine these days, there are a number of tomatoes ripening on your window sill. The colder weather may have forced us to pull out our plants, but we still have LOTS of tomatoes to work with.
The other day I stopped by my friend Kristen's house, to find her drowning in a sea of canning jars and tomatoes... she had picked 90 pounds the day before! I gladly took about 6 pounds off her hands to make sauce with. Cooking with fresh tomatoes is a bit trickier than canned tomatoes because you need to skin them first. Luckily this is an easy task that involves little more than putting on a pot of boiling water.
Here are the steps:
1. Score the underside of the ripe tomato like a cross.
2. Gently drop the tomato into a pot of gently boiling water.
3. Wait about 2 minutes, or until the tomato floats to the surface.
4. Using a spider or a slotted spoon remove the tomato from the water and let cool.
5. Once cool enough to handle, use your fingers to easily slip the skin from the flesh.
6. Now the tomato is ready to be used in a sauce or canned for future use.
My next posting will be about using these tomatoes to make bolognese.
Thursday, September 3, 2009
BLET-B = the perfect brunch
BLET-B is a "bacon, lettuce, egg, and tomato sandwich with basil"
My intention is for this blog to be more about gardening than cooking. The thing is, I moved to a new house on July 1st, not too long before I started this blog. I hope the new occupants are enjoying the vegetables and flowers I planted at our old house in Ballard.
Despite the fact that I uprooted in the middle of the summer growing season, and our new home does not yet have a garden, I had to find a way to grow a few of my summer garden staples (eg: tomatoes, basil, lettuce, etc...). While watering this morning, I thought, "why don't I make myself a BLT with pesto for breakfast?". Then I spied my next door neighbor's hens and decided a fried egg would be the perfect accompaniment.
I sweetened my homemade pesto with some maple syrup to make it taste extra breakfast-y, used an entire Rutgers variety heirloom tomato, and crunchy Romain lettuce.
Wednesday, August 19, 2009
I heart my neighbor's plum tree!
Sweet and Tart!
Yesterday afternoon my neighbor, Richard, came by with a huge bowl of super sweet italian plums. His tree is going off, and he has more plums than he and his family can handle. In between gorging myself on plums today, I decided to make a Caramelized Plum Up-side Down Cake. This spongy, fruity cake is great for both dessert and breakfast.
I made one cake with peaches and the other with plums. The one with plums only was a bit too tart for my tastes, but I think that I'd really like a mix of stone fruits better than any one fruit by itself.
I hope my friends enjoyed!
Caramelized Stone Fruit Up-Side Down Cake
enough plums, peaches, pluots, cherries, etc... to cover the bottom of your baking dish when cut and fleshy parts are face-down.
1 1/2 c sugar
1/4 c butter (room temperature)
1 Tbs olive oil
1 tsp vanilla extract
1 egg (room temperature)
2/3 c milk (room temperature)
1 1/3 c flour 2 tsp baking powder
1/4 tsp kosher salt
1. Preheat oven to 350 F (put on convection if you can). Liberally butter a pie dish.
2. Coat fruit with about 1/2 cup sugar (more or less depending on sweetness of the fruit). Heat oil in a hot skillet, add plums and cook 2-3 minutes to caramelize. Carefully remove fruit and add to pie dish, flesh side down. Try to make it pretty as this will become the top of the cake.
3. Cream 1 cup sugar, and 1/4 cup butter. In a separate bowl mix together vanilla, egg, and milk. In a separate bowl sift together flour, baking powder and salt. With the mixer on low speed alternately add the dry and wet ingredients, just until combined (start and end with dry ingredients). Finish mixing with a rubber spatula.
4. Pour batter over the fruit, pop into the oven, and let bake for 50 minutes (or until a toothpick inserted into the middle comes out clean). Let cool 20 minutes and invert onto a platter. Note that if you wait too long to invert, the cake is more likely to stick to the pie dish.
5. Eat! *Tastes best warm or at room temperature, but is not bad cold.
Friday, August 7, 2009
Thai chicken pasta=easy camping food
Jacob is going to the Phish show at the Gorge amphitheater this weekend. He begged me to go, but I just don't want to do it. In lieu of ditching him, I figure the very least I can do is send him off with some good noshables. I certainly don't want him to starve out there. Thai chicken pasta is a recipe from a friend's mother (Marla Leavitt), and was taught to me by another friend, Matt Paul, before our trip to Reggae on the River in northern CA. The recipe tastes best at room temperature, stores well in a cooler for several days, and is incredibly easy to make. This is now a go to camping salad for me. The only difficult part is finding the Mae Ploy sweet chili sauce, but I can generally find it in the "asian section" of most grocery stores. Here is how you make it.
Thai Chicken Pasta
1 split chicken breast (bone in, skin on)
1 lb short-shaped basta (pene, bowties, etc...)
1 cup basil pesto
about 5 Tbs Mae Ploy sweet chili sauce
about 1/4 cup of the starchy pasta cooking water
1. Season the chicken breast with olive oil, salt and pepper. Roast the chicken in a 400 degree oven for 35 minutes, or until the internal temperature is 160 degrees F. Let chicken rest and cool. Once cool enough to handle, remove the skin and bone from the meat. Either shred or cube the meat into bite-sized pieces.
2. Cook the pasta in boiling salted water.
3. in a small bowl combine the pesto and sweet chili sauce (add chili sauce to taste).
4. In a large bowl combine the warm cooked pasta, chicken, and sauce, and any juice that may have run from the chicken. If needed, thin out the sauce with a little of the pasta cooking water.
Thursday, August 6, 2009
Too many blueberries! how is that possible?
This may seem hard to believe, but somehow I found myself with 3 pints of blueberries that were way past their prime. Knowing that it would be sacrilegious to let the delectable little nuggets of pure ecstasy go to waste, I decided to fry up a batch of blueberry pancakes.
Half way though frying I realized that I was out of maple syrup. What to do? Make blueberry syrup of course!
Here are the recipes:
Blueberry pancakes:
1 Tbs lemon juice
2 cups milk
1 egg
3 Tbs melted butter
1/2 tsp vanilla extract
1/2 tsp lemon extract
2 cups flour
2 Tbs sugar
1/2 tsp baking soda
1/2 tsp salt
1 pint fresh blueberries (or huckleberries if you can get them)
1. mix together wet ingredients in bowl
2. sift together dry ingredients in a large bowl. make a well in the center of the dry ingredients and slowly stir in the wet ingredients. Do not over mix as it will make the pancakes tough.
3. pour batter into frying pan, and drop blueberries onto pancake batter circle.
4. you know the rest...
Blueberry Syrup:
2 pints of fresh blueberries
1/4 cup water
2 Tbs raspberry jam (or whatever you like)
4 Tbs butter
1. Simmer the blueberries and water over medium heat until the blueberries pop and the sauce begins to thicken.
2. Turn off the heat and whisk in the jam. You can pass the sauce through a mesh stainer at this point if you don't like seeds and skins, but I prefer to leave the sauce chunky and rustic.
3. Once the sauce cools down whisk in the butter one tablespoon at a time. This will make the sauce smooth, rich, and silky.
Subscribe to:
Posts (Atom)