Wednesday, January 13, 2010

Scallions


I have a pot of fresh herbs that lives on the windowsill above my kitchen sink. It gives me something pretty to look at when I’m doing the dishes, and fresh flavor boosters when I’m cooking. What I grow in there is constantly changing. The other day I bought a bunch of scallions for a recipe (the root vegetable hash described below). Rather than throwing the root tips in the compost bin, as usual, I decided to see what would happen if I stuck those little roots in my herb pot. Within two days I started to see green growth from the little root nubbins. Within two weeks I had already started to harvest the green tips. What an easy, and unexpected herbal treat! For those of you out there who want to start growing herbs and vegetables, but don’t know where to start, I recommend trying this. It is cheap, fast, easy, and you can do it in your windowsill. Just remember to water the pot every few days, and change the potting mix every 6 months.

Q: Is there anything exciting about cabbage?


A: Why yes, there is.


I have secretly stashed a cabbage in the back of my vegetable drawer for the last 4 weeks. We received it over a month ago in our CSA box, and I don’t think my husband has even noticed. What can a woman do with this dauntingly enormous vegetable? After putting it off for an embarrassingly long time, I decided to come up with a game plan. The result: I decided to use it in my Thai spring roll salad. The cabbage worked beautifully by adding a satisfying crunch to every bite.

This is a salad I invented when after making a plate of spring rolls I threw all of the left over ingredients into a big bowl. The next day I used the peanut dipping sauce as a salad dressing, and declared it a master piece. The following recipe is meant to be more as a guideline rather than a recipe. I always add and subtract ingredients, depending on what I have stashed in the back of my vegetable drawer. The result is a healthy, light, and delicious meal. The salad keeps in the refrigerator for up to 3 days (undressed).


Salad: • 1 ½ cups diced cabbage leaves • 3 carrots, grated • ½ head romaine lettuce, chopped • ½ cup roasted peanuts, chopped • 3 tablespoons chopped mint • 3 tablespoons chopped cilantro • 3 tablespoons chopped basil • 3 tablespoons chopped scallions • 2 cups rice or mung bean noodles (softened)

Peanut Dressing:
• peanut butter • lime juice • soy sauce • warm water • thai sweet chili sauce • rice vinegar • saracha (rooster sauce) • sesame oil • fresh grated ginger

In proportions of your taste, mix dressing ingredients in a small bowl and set aside.

In a large bowl combine salad ingredients. Stir in enough peanut dressing to coat, but not drown, the salad. Enjoy.

*Good options for adding protein are shrimp, chicken, and tofu.

What is a rutabaga and what do you do with it?


The farmers of Jubilee farm are on vacation this month, and as a result I am going through all the veggies from my CSA that I have been putting off using. My house is stuffed with winter squashes, cabbage, and rutabaga because I either cannot think of another creative use for it, or in the case of the rutabaga, I didn't know what it was. Last week I adopted my adventurous persona, and googled "rutabaga". This is what I found out, and what I did with it. Warning: the results were delicious.

What is a rutabaga? Rutabaga is a mostly forgotten root vegetable, that is a member of the brassica family (other members include mustard, cabbage, broccoli, kale, brussels sprouts, turnip, and kohlrabi, among many, many others). In Europe it is often called a Swedish or yellow turnip, as it is particularly popular in Scandinavian countries. While technically rutabaga is a cross between a cabbage and a turnip, it's root tastes more like a cross between a turnip and a broccoli stem. It has a crunchy texture and an exciting sharp taste when raw, but roasts beautifully and mellows out, like a potato or turnip.

What do you do with it?
Rutabaga can easily be added to roasts, purees, and mashes, just like turnips and parsnips. It can also be eaten raw like celeriac. While I have not tried it yet, I imagine it would taste divine if grated or julienned into various salads, especially cole slaws. Below is a recipe for my new favorite dish: roasted root vegetable hash with poached eggs and parsley pesto. Recipe courtesy of epicurious.com


Pesto
  • 2 cups (packed) fresh parsley leaves
  • 1/4 cup extra-virgin olive oil
  • 2 tablespoons pine nuts, toasted
  • juice and zest of 1 lemon
  • 2 garlic cloves

Hash
  • 5 tablespoons Olive oil
  • 2 1/2 cups 1/2-inch dice peeled Yukon Gold potatoes (about 1 pound)
  • 2 1/2 cups 1/2-inch dice peeled parsnips
  • 2 cups 1/2-inch dice peeled rutabagas
  • 1 1/2 cups 1/2-inch dice peeled carrots
  • 1 large yellow onion diced to 1/2 inch
  • 3 garlic cloves, minced
  • 4 green onions, sliced
  • 1 tablespoon kosher salt
  • 1/2 tablespoon black pepper
  • 1/2 tablespoon dried thyme leaves
  • 8 large eggs
  • 2 tablespoons light vinegar, such as white wine or apple cider

For pesto:
Blend all ingredients in processor until almost smooth. Season with salt and pepper.

For hash:
Preheat oven to 400°F. Toss root vegetables with olive oil, salt, pepper, and thyme; spread in single layer over 2 rimmed baking sheets. Roast vegetables until tender, stirring and turning occasionally, about 45 minutes. Stir in garlic; roast 5 minutes longer. Mix in green onions. Fill large skillet halfway with generously salted water and 2 tablespoons of vinegar; bring to boil. Reduce heat to maintain steady simmer. Crack eggs, 1 at a time, and gently slide eggs into simmering water. Poach eggs until softly set, about 3 minutes.

Divide hash among 4 plates. Using slotted spoon, top each serving with 2 poached eggs. Drizzle with pesto. An alternative to the parsely pesto is to top with Tabasco, Tapatio, or your favorite hot sauce. You can also add sausage to the hash to make it more appealing to all the meat lovers out there.

Monday, December 7, 2009

Hearty vegetable soup = a great way to clear out the vegetable drawer


Since moving last July, I do not yet have a fully functioning veggie garden. In response, I am splitting a winter CSA (community supported agriculture) share with some friends. The farm we bought a share from is Jubilee Farm in Carnation, WA. It is a good thing we are sharing it, because each week we receive a HUGE box of produce. I find myself struggling to keep up with the vegetable drawer. One sure fire way to use up my veggies before receiving the next huge box is to make soup. Winter soups are hearty and delicious, and can be made with just about any veggies you like. Since I am mostly receiving root veggies from my CSA box, my soups have been heavy on those ingredients lately.
I made a soup from the following ingredients today:
leeks, celeriac, potatoes, celery, carrots, thyme, rainbow chard, farfalle (bow tie pasta), chicken broth, water, sea salt, butter.
Some of these are ingredients that I did not grow up with, and have only learned about since college.

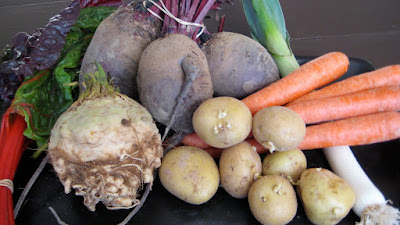
Celeriac, also called celery root, is the really ugly root in the photo above. It is in fact the root of a celery plant, although they are different varieties, one bred for the stalk, and the other for the root. Celeriac has a flavor a lot like celery, but a texture very similar to a potato. This makes it a great veggie to use in purees, mashes, and to thicken soups with.

Leeks are the long scallion-looking things in the photo above. They have a delicate onion flavor, and can be minced and sauteed similarly to onions. Only use the white and light green parts of a leek. Also, be sure to cut in half length-wise, as I have done in the photo, to be able to clean well between the layers. Leeks always seem to trap a lot of soil between the layers... not something you want in your food.

Rainbow chard is a delicious and beautiful dark green leafy vegetable. The leaves are too thick and tough to eat raw, and should be cooked similarly to spinach to be enjoyed to their fullest. The colorful center rib is very tough and stringy in mature leaves, and should be removed prior to cooking.

I made my soup by first sauteing the leeks and fresh thyme in some butter and salt for a few minutes. Then I added the potatoes, celery, minced celeriac and coarsely diced carrots. I let it all saute and brown for a bit. Then I added chicken broth and water (50/50 by volume) to cover. When the potatoes were tender I added a bit of farfalle pasta and then some chopped chard at the very end. Before eating, I grated some parmesan cheese over the soup.

Other things that would be good in the soup:
Any other grains that you may have (rice, quinoa, barley, etc...), beans like lentils, garbanzo, and cannellinis, onions, garlic, tomatoes, kale, parsnips, parsley, oregano, or just about anything else you may have in your veggie bin.

Root veggies!


Winter is the time to celebrate root vegetables. My CSA boxes, from Jubilee farm, are now full of root vegetables with perhaps a squash and some winter greens here and there. Potatoes, celeriac, turnips, rutabaga, parsnips, carrots, and beets are main staples on our dinner table these days. I find that soups, mashes, purees, and roasts are the best ways to enjoy many of these hearty and nutritious veggies.
Here is an example of a recent meal: Roast chicken breasts with potato and turnip mash, and roasted carrots.


Root vegetable mash: I used a combination of potatoes, turnips, and leeks, but parsnips and celeriac would also work beautifully on their own or combined with any of the other root veggies.
This is how to make the mash I made:
Chop and thoroughly clean leeks. Saute leeks in olive oil with salt and pepper, until tender and beginning to brown, then remove from heat. Peel and coarsely dice your root veggies. Cover with salted water, and bring to a gentle boil. Once tender, drain the veggies and return to pot. Add a couple tablespoons of butter, little warm milk, and your sauteed leeks. Mash with a potato masher. Adjust consistency by adding more or less milk. For a smooth puree, rather than a mash, first process your veggies through a food mill or potato ricer, before adding dairy.

Roasted chicken breats: season your bone-in, skin on chicken breasts with olive oil, salt and pepper, and any herbs you like (I used a combination of sage and thyme).
roast at 375 deg. F for approximately 40 minutes or until an instant read thermometer registers between 160 and 165 deg. F. Tent chicken with foil, and let rest for about 20 minutes.

Roasted carrots:
I like to prepare 2-3 carrots per person. Peel and coarsely dice your carrots (1 inch pieces). Season with olive oil, salt and pepper. Place on a sheet pan and roast along side your chicken (375 deg. F) for 30 minutes, or until the carrots are tender and caramelized. If you like your carrots even sweeter, feel free to coat with a teaspoon or so of maple syrup when the come out of the oven, or in the last 10 minutes of roasting.

Hint:
Use any left overs to make chicken noodle soup the next day.

Saturday, November 7, 2009

Pumpkin time


Some of us are mildly in love with the pumpkin. In the last few weeks I have done a lot more with this beloved squash than carve jack-o-lanterns.
I have scooped out the top of tiny pumpkins to turn them into fun votives, I have made pumpkin ice cream, and tonight I made pumpkin butter. mmmmm pumpkin butter. Pumpkin butter is a lot like apple butter, but with pumpkin pie spices and pumpkin rather than apples. It tastes delicious spread on toast or pancakes, or even poured over vanilla ice cream.
Here's how you make it:

3 cups pumpkin puree
3/4 cup apple juice
1 1/4 cup brown sugar
2 Tbs maple syrup
1 tsp vanilla extract
1 tsp cinnamon
1/2 tsp nutmeg
1/2 tsp cardamom
1/4 tsp cloves
1 tsp ginger

In a sauce pan combine all ingredients and mix well. Cook over low heat for at least 1 hour or until mixture is thick. Store in glass jars in the refrigerator for up to 1 month, or up to 6 months in the freezer. Feel free to adjust spices to your personal liking.
*The USDA does not recommend canning pumpkin puree products.

To make your own pumpkin puree, start with 2 sugar pumpkins. Cut the pumpkins in half and scoop out seeds. Place pumpkins face down in a roasting pan, cover roasting pan with foil, and bake at 350 for 1.5 to 2 hours, or until the flesh is very soft. When cool enough to handle, scoop flesh away from skin, and puree in a food processor until completely smooth.


Bolognese sauce: Kristen's tomatoes are now week night meals waiting in my freezer.


With a portion of my friend Kristen's 90 lb harvest in tow, I had to figure out something to do with all those tomatoes.
Bolognese is a hearty, yet decadent, meat and tomato sauce that I would never dream of making on a week night. It requires hours of chopping, browning, deglazing, and then simmering on the stove top. The good news, however, is that it is really easy to make in large batches, and then freeze into individual meal sized containers.
Now that we are in the cool wet season, nothing is better than coming home after a long day and having something hearty and warm on the table in 20 minutes. Bolognese is perfect for lasagna, but as a week night meal, I simply serve it with spaghetti.
Here's what to do to make Bolognese:

2 lbs ground meat (mixture of beef, veal, pork, lamb... your preference here)
2 28oz cans of whole peeled tomatoes or the equivalent of fresh peeled tomatoes
2 cups whole milk
2 cups dry white wine
4 large carrots diced
1-2 stalks celery diced
1 large onion diced
4 cloves garlic
1 hot pepper minced, or 1 tsp red chili flake
2 tsp dried thyme or 1 Tbs fresh
2 tsp dried oregano or 1 Tbs fresh
2 Tbs sun dried tomato paste
Salt and pepper to taste

In a large, heavy bottom pot brown the generously salted meat in batches, over medium high heat. Be careful not to turn the meat often as this will prevent it from developing a nice crust, and fond from developing on the bottom of the pot. Once all the meat is browned remove it with a slotted spoon and let rest in a medium sized bowl. Add carrots, onion, and cellery to pot, and cook over medium low heat. Once the onions start to become translucent add the chili pepper, garlic, thyme, and oregano stiring frequently so the garlic does not burn and bitter. After about 1 minute add the tomato paste, and mix. After about 1 more minute add the meat back to the pot and mix with vegetables.
Add the whole milk to the pot. This step really helps to tenderize the meat, so use this time to break up any large chunks of meat with your wooden spoon. Continue to simmer until the milk has reduced by more than half (it should look almost all gone).
Add the wine to the pot. This step helps to add acid, depth of flavor, and deglazes any fond (brown bits) that might be sticking to the bottom of the pot. Use your wooden spoon to scrape up any stubborn brown bits at this time. Brown bits=great flavor, so make sure to get them worked into the sauce. Once the wine has reduced by more than half, add the tomatoes. Either crush the tomatoes by squeezing them through your hand, or with the back of your spoon. Let sauce simmer for at least 1 hour, and up to 3 hours. Stirring occassionally to ensure that nothing sticks to the bottom of the pot. when finished, sauce should be thick and predominately meaty.
Enjoy!